
Building the tool with Graphical User Interface (GUI) has been one of the tasks I needed much these days. You could write the script to automate some stuff but when you needed to write one for normal users, they would rather double click on the file you sent them. This post is about building the PowerShell tool using the Windows Presentation Foundation (WPF) as a desktop application.
User Request in a nutshell: The users create Adobe Premiere Pro template almost daily for their projects using the existing template. They will simply create the new project folder with the current date and the username in it, create multiple subfolders inside it, copy the premier pro template and rename it to match the project name.
So, I kicked off with creating the functions for creating the folder structure and copying the template with the new name.
Function New-FolderStruct{
    Param(
        [String]$Path,
        [String]$Project,
        [String[]]$SubFolder
    )
    Process{
        If (Test-Path -Path $(Join-Path -Path $Path -ChildPath $Project)){
            Write-Output "The new project path already exist!"
            return
        }
        Else{
            $Root = New-Item -Path $Path -Name $Project -ItemType Directory
            If ($SubFolder){
                foreach($Folder in $SubFolder){
                   New-Item -Path $Root -Name $Folder -ItemType Directory
                }
            }
        }
    }
}
Function Copy-Template{
    Param(
        [String]$Source,
        [String]$Destination,
        [String]$Project
    )
    Process{
        If (Test-Path -Path $Source){
            $FileExt = (Get-Item -Path $Source).extension
            $NewName = "{0}\{1}\{2}{3}" -f $Destination,$Project,$Project,$FileExt

            Copy-Item -Path $Source -Destination $NewName
        }
        Else{
            Write-Output "The Template file is missing!"
        }
    }
}
Then created the user interface from Visual Studio using WPF for desktop application using dotnet framework. When you first ran the PowerShell to see the GUI, it threw an error with the class name. So, to make it work:
- Remove the class name generated by the Visual Studio
- Remove the ignorable design view mc:ignorable="d"
- Modify x:Name directive to be simply Name
How to do this in deails can be read up on Adam The Automator website.
Param(
    [String]$ConfigFile = ".\Config.psd1"
)

[XML]$Xaml = '
<Window xmlns="http://schemas.microsoft.com/winfx/2006/xaml/presentation"
        xmlns:x="http://schemas.microsoft.com/winfx/2006/xaml"
        xmlns:d="http://schemas.microsoft.com/expression/blend/2008"
        xmlns:mc="http://schemas.openxmlformats.org/markup-compatibility/2006"
        xmlns:local="clr-namespace:PremiereProTemplate"
        Title="Premiere Pro Template" Height="450" Width="716.428" Background="White" WindowStyle="ToolWindow">
    <Grid RenderTransformOrigin="0.5,0.5" Cursor="" Background="{DynamicResource {x:Static SystemColors.ActiveCaptionBrushKey}}">
        <Label Name="lblUser" Content="User Name" HorizontalAlignment="Left" VerticalAlignment="Top" Margin="50,29,0,0" Width="156"/>
        <Label Name="lblProject" Content="Project Name" HorizontalAlignment="Left" VerticalAlignment="Top" Margin="50,60,0,0" Width="156"/>
        <TextBox Name="txtUser" HorizontalAlignment="Left" Height="23" Margin="211,29,0,0" TextWrapping="Wrap" VerticalAlignment="Top" Width="342"/>
        <TextBox Name="txtProject" HorizontalAlignment="Left" Height="23" Margin="211,63,0,0" TextWrapping="Wrap" VerticalAlignment="Top" Width="342" RenderTransformOrigin="0.402,1.847"/>
        <TextBox Name="txtOutput" HorizontalAlignment="Left" Height="212" Margin="51,114,0,0" TextWrapping="Wrap" VerticalAlignment="Top" Width="602" RenderTransformOrigin="0.5,0.5" FontWeight="Bold" Text="Result will be shown here..."/>
        <Button  Name="btnCreate" Content="Create" HorizontalAlignment="Left" Margin="577,350,0,0" VerticalAlignment="Top" Width="75"/>
        <Button  Name="btnReset" Content="Reset" HorizontalAlignment="Left" Margin="497,350,0,0" VerticalAlignment="Top" Width="75"/>
        <Button  Name="btnExit" Content="Exit" IsCancel="True" HorizontalAlignment="Left" Margin="50,350,0,0" VerticalAlignment="Top" Width="75"/>
    </Grid>
</Window>'

Add-Type -AssemblyName PresentationFramework, PresentationCore

If (-Not(Test-Path -Path $ConfigFile)){
    $MsgBody = "Config.psd1 is not specified or missing!"
    $MsgTitle = "Config Error"
    $MsgType = [System.Windows.MessageBoxButton]::OK
    $MsgIcon = [System.Windows.MessageBoxImage]::Error
    $Null = [System.Windows.MessageBox]::Show($MsgBody,$MsgTitle,$MsgType,$MsgIcon)
    return
}
Else{
    $Config = Import-PowerShellDataFile -Path $ConfigFile
}

$reader = (New-Object System.Xml.XmlNodeReader $Xaml)
try {
    $Window = [Windows.Markup.XamlReader]::Load($reader)
}catch{
    write-Warning $_.Exception
    throw
}
$ItemNames = $Xaml.SelectNodes("//*[@Name]")
Foreach ($i in $ItemNames){
    Set-Variable -Name "ref_$($i.Name)" -Value $Window.FindName($i.Name)
}
#Get-Variable ref_*

$ref_btnCreate.Add_Click({
    If ([String]::IsNullOrWhiteSpace($ref_txtUser.Text)){
        $ref_txtOutput.Text += "`nWarning: Enter the User Name"
        $ref_txtOutput.ScrollToEnd()
        return
    }
    If ([String]::IsNullOrWhiteSpace($ref_txtProject.Text)){
        $ref_txtOutput.Text += "`nWarning: Enter Project or Slug Name"
        $ref_txtOutput.ScrollToEnd()
        return
    }
    $ref_txtOutput.Text += "`nInfomation: Creating the template..."
    $Reporter  = $ref_txtUser.Text
    $ProjSlug  = $ref_txtProject.Text
    $TodayDate = Get-Date -Format "yyyyMMdd"
    $NewName   = "{0}_{1}_{2}" -f $TodayDate,$Reporter,$ProjSlug

    $ref_txtOutput.Text += (New-FolderStruct -Path $($Config.Destination) -Project $NewName -SubFolder $($Config.SubFolder) | Out-String)
    $ref_txtOutput.Text += (Copy-Template -Source $($Config.Source) -Destination $($Config.Destination) -Project $NewName | Out-String)
    $ref_txtOutput.ScrollToEnd()
})

$ref_btnReset.Add_Click({
    $ref_txtUser.Text = ""
    $ref_txtProject.Text  = ""
    $ref_txtOutput.Text   = "Result will be shown here..."
})

$ref_btnExit.Add_Click({
    Exit
})
$Null = $Window.ShowDialog()
As always, to separate the configuration data and the actual code, create the config file with the required values.
@{
    Source      = 'D:\Adobe\Templates\AdobePremiereProTemplate.prproj'
    Destination = 'D:\Projects\'
    SubFolder   = @('Picture','Music','Video')
}
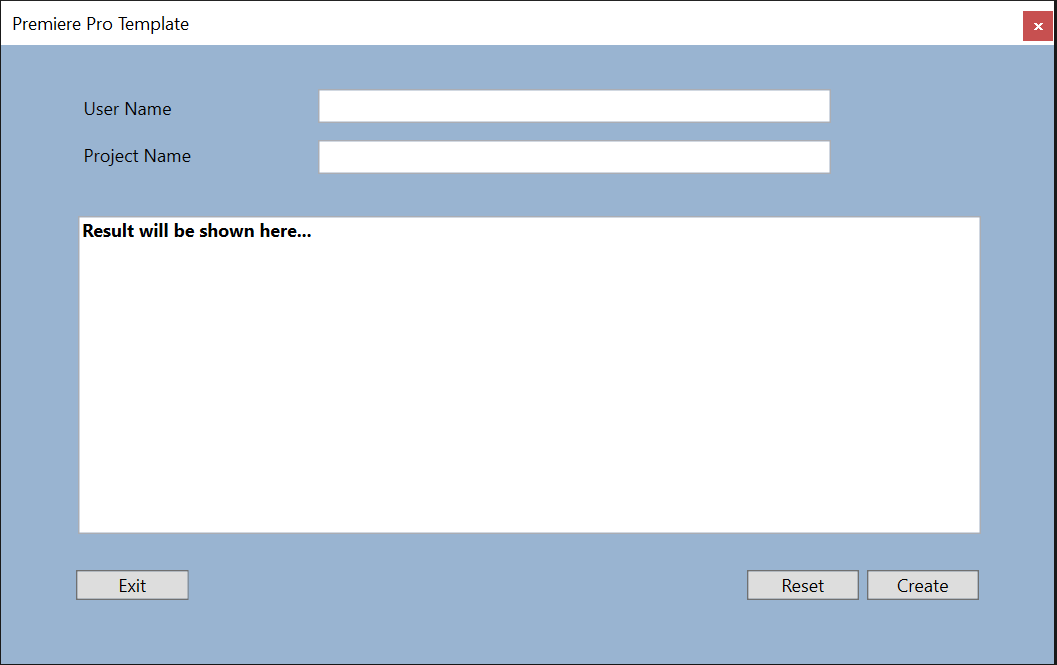
Now the script, the data file and the GUI work together and run as expected. Once you run, you will get the screen like this.
Note: You still need to copy the two functions into the main script Deploy-AdobeTemplate.ps1. Place them just below the Param() code section.
The last step is to create an executable file out of it. There are many tools out there but I choose to use PS2EXE module. It's quite easy to use. Once you've installed the module, just run Win-PS2EXE and point to the .ps1 file you want to compile as an executable (.exe) file and output folder location.
Hope you could tweak and re-use as necessary if you come across needing something like this.